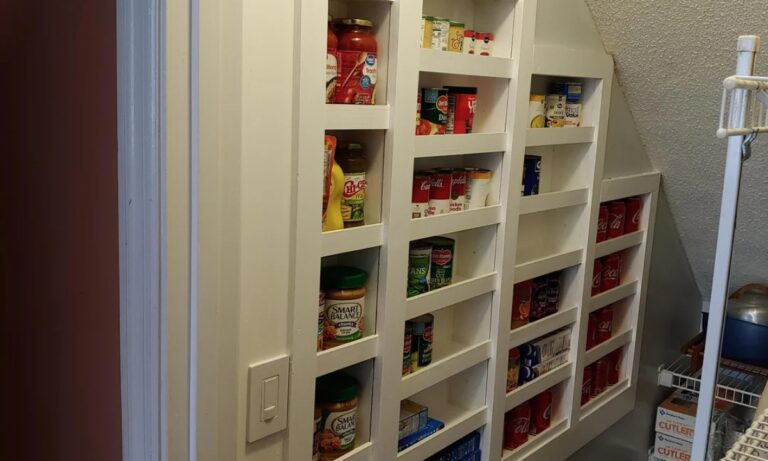
2025 Best DIY Storage Idea: Recessed Shelves Between Studs
You might look at your walls and feel like you need more space.
Things can get cluttered when you do not have enough storage.
Recessed shelves built into your walls can solve this problem for you.
This guide will help you build your own shelves safely.
You will learn how to avoid common mistakes and get a great result.
Follow each step to create storage that looks like it was always there.
Check If Your Wall Is Safe for Recessed Shelving?
You must check your wall before you make any cuts.
Use a stud finder that can also find hidden wires and pipes.
Move the tool slowly across the area where you want the shelf.
Do not cut into the wall if the stud finder beeps or shows a warning.
You should never use an exterior wall for this kind of project.
Also avoid walls in your kitchen or bathroom where pipes are often hidden.
If you are not certain about what is inside, drill a very small test hole.
You can use a flashlight to look inside the wall through this hole.
Pick a different spot if you see anything other than empty space.
What You Need: Tools, Materials, and Prep
You will need a few important tools to start this project.
Gather a stud finder, a tape measure, a pencil, and a level.
You will also need a utility knife and a drywall saw for cutting.
For building the shelf itself, get a drill with screws and some two-by-four wood.
You will also need wood boards or plywood to act as your shelves.
Have trim, caulk, sandpaper, and paint ready for the final touches.
Prepare your workspace by laying down a drop cloth on the floor.
This will help you catch dust and keep your area clean.
A flashlight will be useful for looking inside the wall cavity.
Planning the Perfect Shelf for Your Space
First, think about what you want to store on your new shelf.
This could be books, spices, small decorations, or toiletries.
Knowing what will go on the shelf helps you plan its size.
Measure the space between the two wall studs carefully.
This distance is usually about fourteen and a half inches.
Also, check how deep the empty space inside your wall is.
Decide how many shelves you want and how far apart they should be.
Make sure your plan does not cover any electrical outlets or switches.
Drawing a simple sketch of your plan is a very helpful step.
How to Find and Cut Between Studs Safely
Find Stud Edges
Use your stud finder to locate the edges of two studs.
You can also knock on the wall and listen for a solid sound.
This tells you where it is safe to cut your opening.
Scan for Wires and Pipes
Slowly move your stud finder over the area again.
Make absolutely sure there are no electrical wires or water pipes.
Your safety is the most important part of this project.
Mark Cut Lines
Use a pencil and a level to mark where you will cut.
Your lines should be straight and stay between the two studs.
This will be the outline for your new recessed shelf.
Drill a Test Hole
Drill a small hole inside the area you have marked.
Shine a flashlight into the hole to check one more time.
Confirm that the space is completely empty and clear.
Score and Cut Drywall
Use your utility knife to carefully cut along the pencil lines.
Then, use a drywall saw to finish removing the wall section.
Cut slowly and always be aware of what is behind the wall.
Framing and Building the Recessed Shelf
Measure the opening you have created in your wall.
Cut two pieces of two-by-four wood to fit the width of the opening.
These pieces will be the top and bottom of your shelf frame.
Place the top piece of wood between the studs at the top of the opening.
Do the same with the bottom piece at the bottom of the opening.
Use your drill to attach these pieces securely to the studs with screws.
Now, cut your shelf board to fit perfectly inside the opening.
Place the shelf where you want it and make sure it is level.
Attach the shelf to the frame and studs using screws.

Pro-Level Finishing for a Built-In Look
Use wood filler to cover any screw holes or small gaps.
Once the filler is dry, use sandpaper to make the surface smooth.
This prepares the wood for painting and gives a clean look.
You can add trim or molding around the edges of the opening.
This will hide any rough cuts on the drywall and look very finished.
Attach the trim with small nails or a strong wood glue.
Wipe away all the dust from sanding before you start to paint.
Paint the shelf and the trim the same color as your wall.
Let the paint dry completely before you place your items on the shelf.
Fixing Common Mistakes and Troubleshooting
If the drywall edges are rough, you can smooth them with sandpaper.
You can also use a utility knife to clean up any uneven spots.
This makes it easier to attach the trim neatly.
Sometimes, small gaps can appear between the shelf and the wall.
You can easily fill these gaps with a little caulk or wood filler.
Smooth it out with your finger for a seamless look.
If a shelf is not sitting level, you can fix it.
Just loosen the screws that are holding the shelf in place.
Adjust the shelf until it is level and then tighten the screws again.
Conclusion of Best DIY Storage Idea
Building recessed shelves is a smart way to create more storage.
It uses space that is already there but hidden inside your walls.
You can complete this project with basic tools and some patience.
Always remember to put safety first by checking for wires and pipes.
Taking your time with planning and measuring will give you the best result.
You will end up with custom storage that makes your room look great.rials.
You followed a clear plan and built something lasting.
Enjoy your new bench and the organized space it creates.